While sharp focus can freeze motion in time, blurring can create a powerful impression of movement. Photoshop's Motion Blur filter is designed with this in mind.
 The Motion Blur Filter
1. Preparation:
Using Motion Blur effectively takes a little preparation. Used straight on an image, it creates a loss of detail, or merely replicates the effect of camera shake. In this image, we want to preserve detail while creating a feeling of rapid motion. 2. Selection:
To start, make a feathered selection of the rear half of the girl. A Feather setting of about 6 pixels should be sufficient for a lowresolution shot, but you need to use higher values for high-resolution images.

Ctrl/Cmd + J to copy and paste it to a new layer.
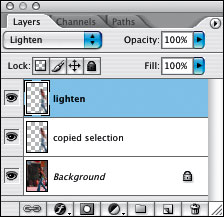
Call the new layer "copied selection."

3. Now Blur Keep the copied selection layer active and go to
Filter > Blur > Motion Blur. Set the angle to 0 degrees and the distance to 90 pixels.
 Make sure the Move tool is selected, then press the right arrow key on the keyboard about 12 times
 to move the selection to the right.
This gives the impression that the girl is leaving a blur of movement in her wake.
For a stronger effect, merely duplicate the copied selection layer.
TIP Blurring with Blend Modesand its result like this :
After duplicating the copied selection layer, try changing the blend mode of the top version to Lighten.
This produces an almost ghostly effect.

No comments:
Post a Comment
post a comment before leave this blog :)