In the case of a fingerprint, you'll need a very good scan. The print will be no larger than an inch by 2 inches, and you need to see that detail enlarged at least 6 times. So, the prints should be scanned together, at the same time, in the same scan at 600 to 1200% enlargement at 72ppi. Your scanner software will offer that setting. If it only offers resolution, and not size enlargement, then you'll push the resolution to 1200ppi. This yields a scan large enough to inspect in great detail on your computer monitor, and will provide highly detailed prints if need be.
In the case of shell casings, you'll need a macro-photo of the ends at least 10 megapixels. To guarantee high precision for comparison purposes, both shells should be locked into a vise or clamp, photographed using a tripod, with the camera lens as perpendicular to the flat ends of the casings as possible. By clamping together, and shooting both at the same time, even if the alignment is a little off, you'll still be able to superimpose them. together.
Fingerprints in Photoshop
Once you have a good high resolution scan of both fingerprints, you'll want to optimize them to the essential tones. You'll be converting them almost to straight line shots. For this you will use an adjustment layer:
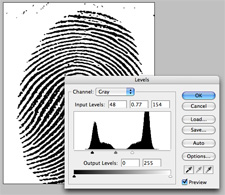
- Layers > New Adjustment Layer > Levels.
Ideally, you've scanned both fingerprints to be compared, side-by-side in the same scan. This makes sure the same adjustments are implemented on both prints.

Using Difference blending mode
In the above screen, you see we've moved the second print to be compared to a new layer above the original print. By setting the Layer Blending Mode to "Difference" you'll immediately see any differences between the two prints. "Difference" mode compares the to layers by overlaying the negative and positive layers. When the image is exactly the same, and you have them lined up, the view will go black. Any white spots or areas in the print will be the difference. This is one way to analyze the differences between the prints. You can start a new layer above those two, and use the pencil or brush to highlight or circle differences of interest that you want to further analyze

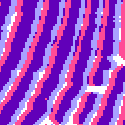
Using Color to compare
You can also use color to compare the two prints. When setting the top layer's opacity to allow the print below to show through, you will get a good visual test of the print's differences. We've colorized one red and one blue then set the opacity to 70%. Here's how to colorize those layers. Assuming you have a pure black and white image, you'll need to - make sure your "Mode" is set to RGB. ( Image > Mode > RGB )
- Select the layer to be colorized, tap 'V' to select the 'Move' tool...
- Choose: Image > Adjustments > Hue/Saturation

- Click and activate the "Colorize" button in the lower right.
Move the "Hue" slider (the top slider) either way to obtain the desired color. Here we set to RED.
 The middle slider, or "Saturation" provides the intensity of the color.
Follow the above for both print layers, colorizing each a different color, and then set the Opacity slider in the Layers palette to about 70%. Differences in the prints should then become apparent.
Bottom Line
Keep in mind, these techniques in no way should be considered "legal" in a court of law. The Law Enforcement industry has tried and proven ways of comparing, indexing, storing and distributing fingerprints -- and there are some sophisticated, specialized software programs for doing so.
No comments:
Post a Comment
post a comment before leave this blog :)